Custom Search

Monday, June 2, 2008

How To Increase Your Blog Traffic

Is your blog gathering dust instead of generating high traffic? It's a common problem for bloggers. Their blogs are good and their postings are interesting, but no one is coming to visit and they want to know how to increase traffic. This is actually easier than it seems once you know how. In this article, we will go over 8 specific methods of increasing traffic. These are guaranteed methods to draw more visitors to your blog.

Tip #1: Sign up for pinging services

It seems pretty obvious, but even many experienced bloggers don't sign up for pinging services. If you don't know what pinging means, when your blog is updated a "ping" is sent out by the services you've registered with to let participating sites know that your blog has been updated. People who are visiting these related sites or get feeds from them will then see your blog flash across the side of the screen as "newly updated".

Pinging services include weblogs.com, Google Blog Search, and ZingFast. Do an engine search to find more of these services, there are a lot of them.

Tip #2: Sign up for Technorati

If you go to technorati.com, you'll see an option on the left side of the screen called "Claim Your Blog". Submitting here allows you to get updated link counts, add your photo or logo to Technorati, and see your Technorati link. Having your blog claimed on Technorati helps to increase traffic because the millions of people who go to that site will have a chance to see your blog on there.

Tip #3: Sign up for FeedBurner, an RSS service

What FeedBurner basically does for your blog is help you to promote your blog's content and build and measure your audience. In other words, it helps you increase your blog's traffic. As with the pinging services, check the search engines for more sites you can send your RSS feed to, as there are a lot more of these as well.

Tip #4: Bookmark your blogs at places like del.icio.us

You can set up an account and profile at del.icio.us. Then you can add links to your blog along with excerpts from it. Anytime someone visits your profile on del.icio.us, they will see a link to your blog and excerpts. There are other social bookmarking sites that you can use in much the same way, a pair of currently popular ones are Digg and Twitter. The bottom line is, using these social bookmarking sites can help you increase traffic.

Tip #5: Post comments at other blogs

No, this doesn't mean you should go and spam other blogs with comments that are only there to promote a site. It means that you should visit similar blogs to your own and as appropriate post legitimate comments and then sign your name along with a link to your blog. This way, people know you aren't there just to promote your site--you're there to post a good piece of feedback and also say where you're from.

Tip #6: Ask owners of other blogs to post a link to yours

Find other blogs that are similar to yours. If they seem to be reasonably popular (that is, they have a good amount of comments for each post), you can try to contact the owner of the blog to add a link to yours if they have a links section. To make them really want to do this, you can offer to link back to their blog on yours. People do this reciprocal blog linking all the time and it does help to increase traffic.

Tip #7: Use keywords in your blog for SEO

Like regular web pages, having a good keyword density on a blog is a terrific way of getting search engine spiders to notice your page. If your average blog posting is around 200 words, try to use 2-6 repetitions of each keyword per blog post.

This would create a keyword density of between 1 and 3 percent, a respectable number. Remember that you don't want to use too many keywords, as that will make your blog postings read poorly. Also be sure that the keywords used are relevant to your blog. Before even making a blog posting, decide what the post will be about and then select a keyword or two to use in your post. It's a surefire way of getting more traffic to your site!

Tip #8: Submit to site directories

Most site directories out there - and there are thousands of them - have a blog category. Once you've got a reasonable amount of content on yours, start submitting it to these directories. They are good ways to be found by searching surfers and each directory listing you're given will eventually be counted as a back-link by the engines. A very good thing!

To your success,

http://www.yourbusinessmanuals.com

PS... Signing up with the services mentioned here is a quick, painless way of increasing traffic to your blog. So start signing up today!

I've been involved in internet marketing for about 2 years, and 'old school' entrepreneurial businesses for many years before that. I am currently the owner of Your Business Manuals (www.yourbusinessmanuals.com), which offers online business operators the information and software they need to achieve their online business goals.

How to Attract Links and Increase Web Traffic

Links and traffic… who wants some?

The number of excellent resources that have come out since the beginning of the year on attracting links and building traffic has really mushroomed. Plus there are some timeless classics that are still very relevant today.

I think it makes sense to compile the very best in one handy location and share it, so here’s my entire collection. If I missed your link and traffic resource let me know and I’ll take a look.

Now, it doesn’t matter if you like the term “link baiting” or not. It’s the process that one goes through to attract links that matters, not whether you prefer to think of your content as bait for links. I like to think that creating content that increases web traffic and builds links simply falls under the general social media optimization marketing buzz phrase that is gaining in popularity.

So, here’s your ultimate “how to” guide to creating content that attracts links and drives traffic in the social media environment:

101 Ways to Build Link Popularity in 2006 | SEO Book

101 Web Marketing Ideas and Tips | SEOpedia

25 Tips for Marketing Your Blog | Online Marketing Blog

10 Remarkably Effective Strategies for Driving Traffic | SEOMoz

8 Reasons Why Lists Are Good for Getting Traffic to Your Blog | Problogger

7 Ways to Get to the Top of the del.ico.us Popular Page | Problogger

3 Ways to Immediately Increase Search Engine Traffic | Performancing

How to Get Traffic For Your Blog | Seth Godin

The Art of Linkbaiting | Performancing

The Art of Blog | SEO Black Hat

What is Linkbaiting? | Modern Life is Rubbish

SEO Advice: Linkbait and Linkbaiting | Matt Cutts of Google

Problogger Link Baiting Series | Problogger

Secrets to Beating the Sandbox 2.0 Revealed | Link Building Blog

What Makes a Site Link-Worthy? | Eric Ward

Using Digg to Attract Hits | Slate

Using Digg and Netscape to Get Traffic | Pronet Advertising

Social Bookmarking for Traffic | SiteProNews

The Sandbox and Delicious | Graywolf’s SEO Blog

Unleashing the IdeaVirus | Seth Godin

Viral Copy | Copyblogger

Building Traffic to Build Your Fan Club | Copyblogger

Trust Rank and Your Domain | Link Building Blog

Generating Buzz With Link Baiting and Viral Campaigns | Search Engine Watch

Linkbaiting for Fun & Profit | Search Engine Journal

Link Building Guide | Jim Westergren

Link Baiting & Effective Link Building | Search Engine Journal

Link Baiting and Viral Search Success | Search Engine Roundtable

How Much is Link Bait Worth? | Cartoon Barry

Link Baiting (How Nick Wilson Created SEO Even Seth Godin Could Love) | Stuntdubl

Link Baiting Case Study from Search Engine Journal | Search Engine Journal

Link Bait | SEO Book

The 8 Free Things Every Site Should Do | Seth Godin at Squidoo

Building Traffic With Article Marketing | Copyblogger

Link Building Blog | Text Link Ads

Link Building Wiki | Text Link Brokers

Advanced Link Building Tactics | SEOMoz

Adding a Java/HTML script to your blog

Recently I noticed maya was having a problem adding a ticker from tickerfactory.com to her blog and I also noticed that rosebud added a website counter to her blog as a post, which would render it ineffective once that post was archived or if a reader accessed another post directly without going to the blog's main page. So I thought it would be best to make a post to address the issue of Adding HTML/Java scripts to a blog, if even small one.
If we were to take maya's ticker script as an example of a script we want to install on a blog, we would basically start by copying the script from the ticker webpage after customizing the ticker ( use CTRL+A to select the whole code and CTRL+C to copy it ).

Now after copying it from the ticker webpage we have to insert it into the blog . To do that we go to the Dashboard and pick "Layout" from the options presented, then we will be led to the "Page Elements" page as shown below.

In it we can see the blog's layout, from which you choose were you want to insert the ticker ( in our example ) and you click the "Add a Page Element" link at the top of that section, after which you will be presented with the following pop-up page.


Now all you have to do is click the "HTML/Java Script" "ADD TO BLOG" button and you will get an empty box in which you paste the previously copied code and then press the "SAVE CHANGES" button in the subsequent page and you should be done. If there is no problem with the script all should be well and in tip-top shape, and Maya should have her Birthday ticker going :P.

How To Put Adsense Ad in Blog

The Quick Answer

  • Go to the Template | AdSense tab and sign up for AdSense, if necessary.
  • Select the size and color of your ads.
  • You'll see a preview of your blog as you make changes.

Note: This article assumes you are using a classic template. On a Layouts-enabled blog, just add a new page element and select the AdSense option.

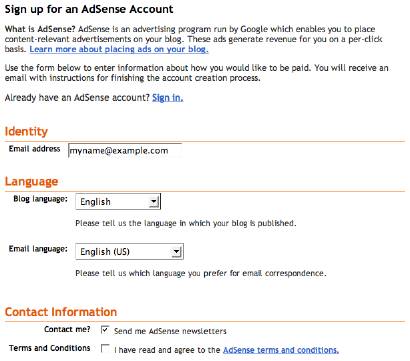
Adding AdSense to your blog is easy. Go to the Template tab in Blogger and you'll see an "AdSense ads" tab below it:

If you don't have an AdSense account already, you can sign up for it right here within Blogger. Just enter a valid email address, choose a password, fill in some contact information (so you can get paid!) and then Blogger will register your account for you right away. If you do have an account already, just use the "sign in" link instead.

Once you've completed the sign-up form, or logged in to an existing account, you'll see a special preview version of your template, showing your blog as it will look with your new ads:

Using the menus above the preview, you can easily change the size, shape, and color of your ads, without ever needing to edit the code directly. The color menu has some preset color schemes, but also some flexible options that try to match, contrast, or blend with whatever template you happen to be using. Try them all out and see which setting works best.

Once you've decided how you'd like it to look, just save the changes and republish your blog. Then go check your email.

While you were deciding on layouts and colors, you probably received a confirmation email from AdSense. Find that email and click on the link it gives you to confirm your email address. Be sure to read the rest of the confirmation email as well, since it will contain other information on finishing the registration and approval process. Until your email address is confirmed and your AdSense application is approved, your ads will only show public service announcements (PSAs) rather than targeted ads. Since you don't get revenue from PSAs, you'll want to be sure to do this soon, so the AdSense bot can crawl your site and determine appropriate ads to show.

And now you're done! Congratulations -- you've got AdSense!

Notes:

  • There may be a bit of a delay before the AdSense bot gets to your site and you start getting targeted ads, though that should happen within 48 hours. Just be patient and it will get there in time.
  • This feature does not currently provide a way of moving the ads, though the default location used is one that tends to provide the best results. If you would like to move it elsewhere, such as to your sidebar, you will need to edit your template code directly. See How to put AdSense in your blog's sidebar for more details.
  • You can see how well your ads are doing by checking the 'Reports' tab on the AdSense website to look at your Ad performance. Keep in mind that reports appear an hour or so after a change has been made (and may sometimes be delayed up to 24 hours).
  • To change your payment information, or other account details after you've signed up you'll need to go to the main AdSense site and log in to your account there.

HOWTO: Submit a Sitemap to Google Webmaster Tools

Once you submit your blog and verify your ownership to GWT, the next step is to add a sitemap.

Put in a simple way, a Sitemap is an XML file carrying the details of the posts in your blog. Because it is an XML file, computers (computer programs to be precise) find it easy to read it. Such files are also known as machine readable files. (Note, however, that the Sitemaps we refer to here are different from the human readable HTML pages that certain web sites carry, which guide the human visitors to all the pages on those sites). These Sitemaps are processed by search engine spiders such as the Googlebot, to discover the pages in web sites/blogs. Sitemaps are particularly useful to be used with blogs that have dynamic content. See the About Sitemaps help topic on GWT help center for more information on them.

The purpose of this article is to illustrate how to add a Sitemap of your blog to GWT. You can accomplish this by following the steps given below.

1) Login to GWT and click Sitemap -> Add for the relevant blog. (if you have submitted more than one blog, all of them will appear in your dashboard)

2) Choose General Site Map from the next screen.

3) Under the 3rd option which reads as My Sitemap URL is, type the following line.

rss.xml?max-results=500&start-index=1

http://[your blog name].blogspot.com/rss.xml is the default RSS feed for your blog. Since the RSS feed is an XML file, that can work as a Sitemap. The two parameters we provided in the above line instruct GWT to take 500 posts starting from the first post, as the content of this Sitemap. Later, if you want to add the second 500 posts, all you have to do is to add another Sitemap which looks like:

rss.xml?max-results=500&start-index=501.

It is not a must to submit 500 posts at a time. It can be any number as long as the Sitemap does not exceed the limit of 50,000 URLs or 10MB in size.

4) Click Add General Site Map

You will see a confirmation page once the Sitemap is successfully added. Be a little patient until the Googlebot consumes this and build up the index for your blog. Remember, it can take well over a month for indexing to happen.

The following figure illustrates the 4 steps just described.

Increase Browsing Speed for IE and Firefox

You really don’t need to your browser in case you are using Firefox because it is a browser which has been specially designed for optimized and fast browsing but if you can make it even a little more fast that would certainly be a treat for you. Likewise there is a trick to make Explorer 6 fast too. Browsers are designed to work with fast connections but with this trick even dial-up users can experience fast and smooth browsing.

and IE Browsing Speed

I shall be teaching you two tricks which work separately on and Internet Explorer. It doesn’t require you to be some expert rather all you have to do is change some registry values and you are done. I have also included a video tutorial for those who want to see it step by step visually. This is perhaps one of the oldest tricks to and IE but it still works great.

Trick to Increase Speed

1. Open and in the address bar write about:config and press enter
2. Double click network.http. and set it to True
3. Double click network.http..maxrequests and set value to 10 from 4
4. Right click and create a new string nglayout.initialpaint.delay and set its value to 0

You are done. Enjoy lightning fast browsing and now for IE.

. Go to Start –> Run and type regedit
2. Select HKEY_CURRENT_USER –> –> Microsoft –> Windows –> Current Version –> Settings
3. Increase the values (DECIMAL) from default to a higher value e.g. 10

See the difference in speed of IE

Here you go with a step by step video tutoria